
| Step by Step Clock Hands Mounting Instructions |
|---|
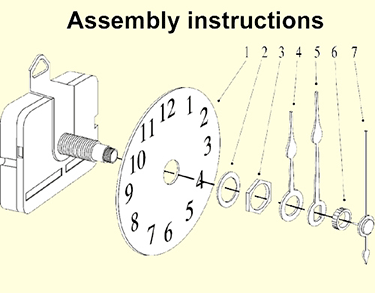
| 1. Drill a 3/8 inch hole through the material you are working with and insert the movement. |
| 2. Slide brass washer over shaft. |
| 3. Attach dial mounting hex nut. |
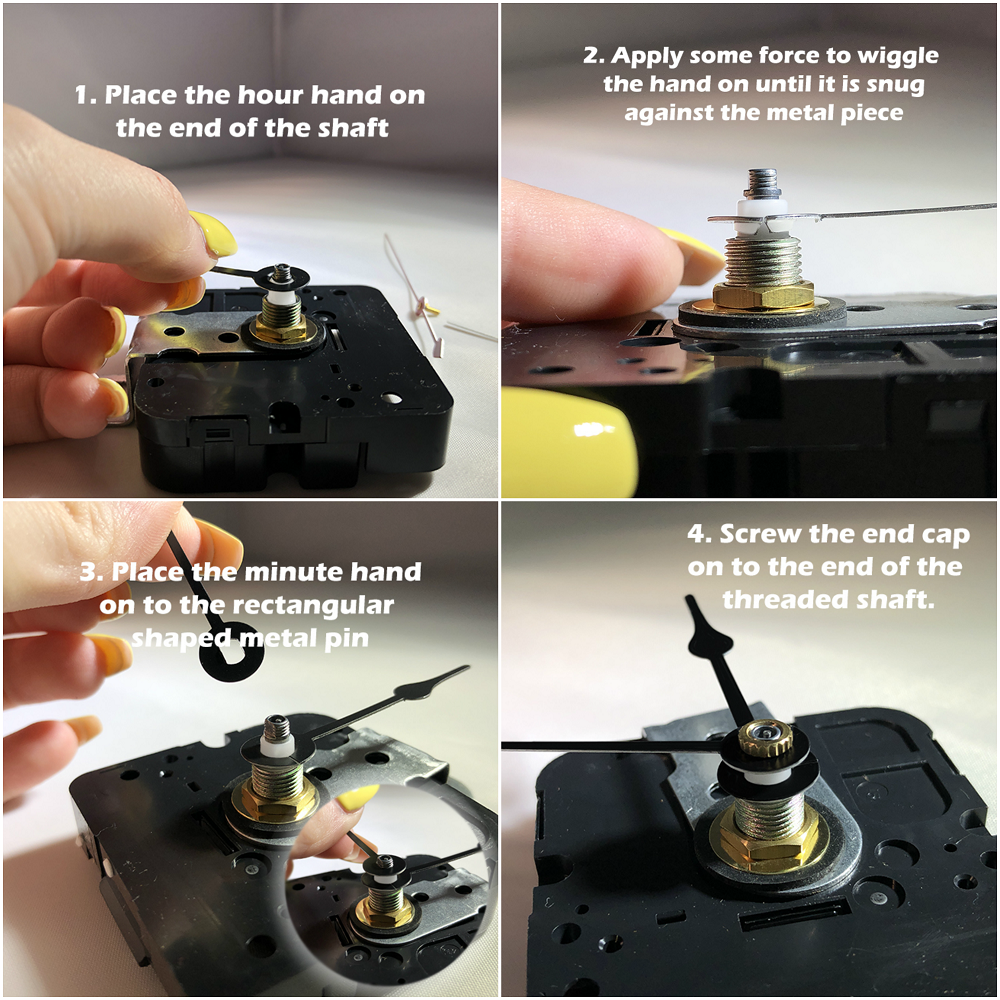
| 4. Gently press hour hand onto shaft at 12:00 position. |
| 5. Place minute hand over shaft at 12:00 position. |
| 6. Gently screw minute nut in place. |
| 7. a) Press on second hand at 12:00 position. b) If you did not receive a second hand (such as with High Torque Movement) then you will install the end cap instead of the minute hand nut and second hand. |
| 8. Install a Fresh Duracell or Energizer Battery - no other brands are reliable with any of our clock movements. |
Set your clock at the 12:00 position exactly - either when installing the hands or changing a battery. It ensures synchronization - do this whenever installing a battery and then move the hands to the correct time using the dial
(or small spindle on the side of a small clock insert).
First, and this is almost always the culprit - install a fresh, brand-new Duracell or Energizer battery that is NOT a rechargeable type. We almost never have a faulty clock part, so we always ask that this be checked first.
b) If that doesn't work, also try a battery from a separate fresh pack - we've found this solves problems too!
Second, check that your battery connection is firm. The battery shouldn't wiggle at all when in place. You may want to pull the little metal tabs in towards the battery for a firmer fit you can use any small tool to do that without harming the clock - just a little bit.
Third, make sure your clock hands don't touch at all when they move around. Any rubbing can slow them or move them improperly.
b) If you have a clock insert, many can be taken apart to adjust the hands. If not, just let us know.
If you are using a pendulum, the pendulum swing mechanism has to be completely perpendicular to your wall. The pendulum action is based on momentum, not on the battery. We haven't had to replace a movement because of a faulty pendulum. We're here to help! So just ask if any of these tips don't quite work.
Make sure the end caps/end nuts are on perfectly straight - they are tiny - so may take a couple of times to get them right.
Hangers are optional. Sold separately for standard clock motors
(Use our picture hardware to hang larger clocks.)
Clock hands can be trimmed unless they have the metal weight on the tail end (only on large hands)